
It's beginning to look a lot like Independence Day! Well, at least at my house it is. Independence Day has been my favorite holiday for as long as I can remember. Even as a kid, when everyone else liked Christmas or Halloween, I was an Independence Day type of girl. Fireworks, summer weather, and great food; what more can you ask for?
Like most things last year, I didn't get to celebrate Independence Day to the fullest, which is why I decided to go really over the top this year. To celebrate, I've been doing a 4th of July DIY project every day this week on my Instagram account, @successinthebag. It's been so much fun working on these projects and has really put me into the patriotic spirit. Below I've included each of my projects and steps on how to make them:
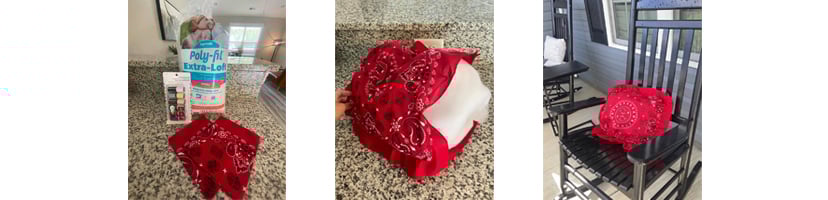
Monday: Bandanna Pillow
On Monday, I did the cutest home decor project, a bandanna pillow. It looked so cute on my front porch rocking chair and brought a little extra red and white to the decor I already had. Below are the items needed and directions to do this project at home:
What you'll need:
- Two Bandannas (any color will do, but I highly suggest red, white, or blue)
- Needle and Thread
- Pillow Stuffing (the more, the merrier)
How to Make:
- Line up your two bandannas.
- Using your needle and thread, sew up three sides of the bandannas along the edge of the design.
- Stuff the bandannas as full as you'd like it.
- Sew up the fourth side, and voila, you have a cute pill
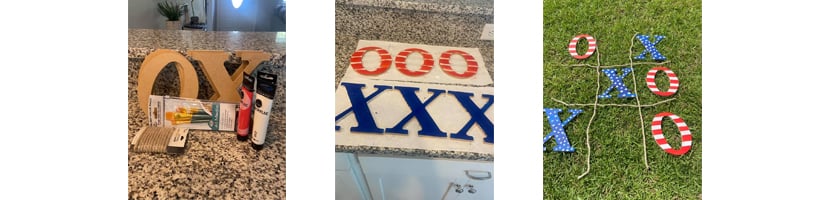
Tuesday: Tic Tac Toe
This project would be the perfect addition to any at-home BBQ. Both kids and adults love a traditional tic tac toe game, and the patriotic version is so much more fun! The best part about this project is that you could paint one side of the letters patriotic and the other side a neutral color for everyday use.
What you'll need:
- Three Letter X's
- Three Letter O's
- Acrylic Paint
- Painter's Tape
- Star Stickers
- At least 12ft. of jute cord
How to Make:
- Paint all of your letters white (may need a few coats. I used acrylic paint but wished I would've just gotten spray paint for this step.)
- Use painter's tape and tape your O's where you'd like your red stripes. Try to get them even. (I used masking tape because I forgot painter's tape. It worked fine but would have been better with painter's tape.)
- Paint over the tape with red acrylic paint and let dry.
- Place star stickers on your X's. (I didn't even think about star stickers when doing this project. I thought I would be artistic enough to paint stars, but.... I settled for polka dots.)
- Paint over the star stickers with blue paint and let dry.
- Remove the tape and stickers.
- Cut four strips of jute cord and layout for game set up.
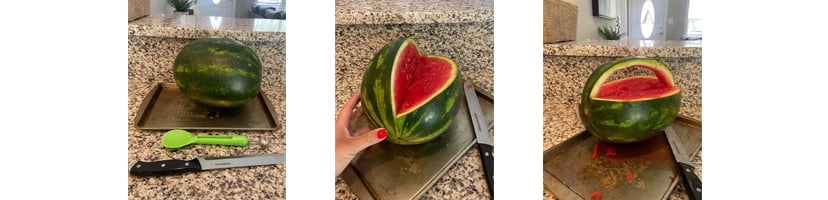
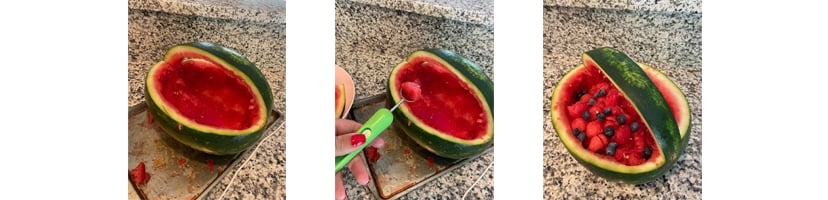
Wednesday: Watermelon Basket
This project was the one that I chose to challenge myself. I cannot, for the life of me, cut a watermelon. However, I was bound and determined to find a new way to do it, and I DID! This watermelon basket was so cute and would be perfect for any summer event.
What you'll need:
- Medium Size Watermelon
- Larger Serrated Knife
- Melon Baller
- Baking Tray (to catch the juice)
- Additional fruit: blueberries, raspberries, pineapple, etc. (I didn't do this but wish I had to make the basket more full looking.)
How to Make:
- Decide where you want to place your handle and how thick you'd like it to be on the watermelon.
- Start on one side of where you'd like your handle, cut a right angle about halfway down the watermelon, and remove the leftover watermelon. Repeat on the other side, so you have a center strip for the handle. (see images below) Save the leftovers for later.
- Cut around the rind in the center strip and remove the watermelon to create the rind handle.
- Hollow out center of watermelon.
- Use the melon baller to scoop balls of watermelon out of the leftovers that you saved.
- Add additional fruit to make the basket full.
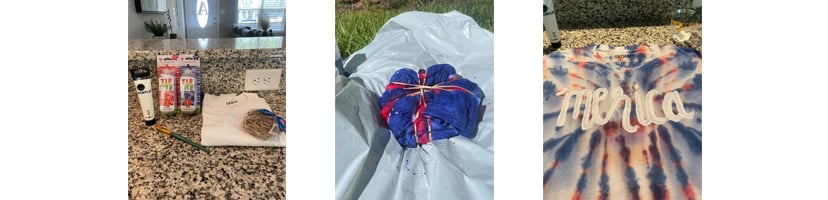
Thursday: Tie Dye Shirt
I wanted to make a tie-dye t-shirt because they remind me of childhood summers and are so in style right now. I went with a tie-dye pattern that resembled a firework and chose red and blue dye to be patriotic! This shirt is perfect for a cover-up on the boat or with shorts at a 4th of July cookout!
What you'll need:
- White T-Shirt
- Red Tie-Dye
- Blue Tie-Dye
- Rubber Bands and Gloves (Check your tie-dye kit first because some kits include them)
- Acrylic paint (optional, but I thought it was cute to paint 'Merica on my shirt in white acrylic paint. I actually reused the paint from tic tac toe.)
How to Make:
- Wet your white t-shirt until it is damp
- Find a tie-dye pattern online and follow the instructions. I chose the spider pattern, which looked kind of like a firework to me.
- Place rubber bands according to the pattern.
- PUT ON GLOVES. Do not skip this step! No matter how careful you are, you will get dye on you, and red and blue fingertips are not a cute way to be patriotic.
- Mix up your dye
- Squirt dye according to pattern directions
- Place the dyed shirt in a plastic bag and let it sit for 6-8 hours, or what the dying kit instructs you to do.
- Hand wash and air dry
- Once dry, paint your patriotic phrase.
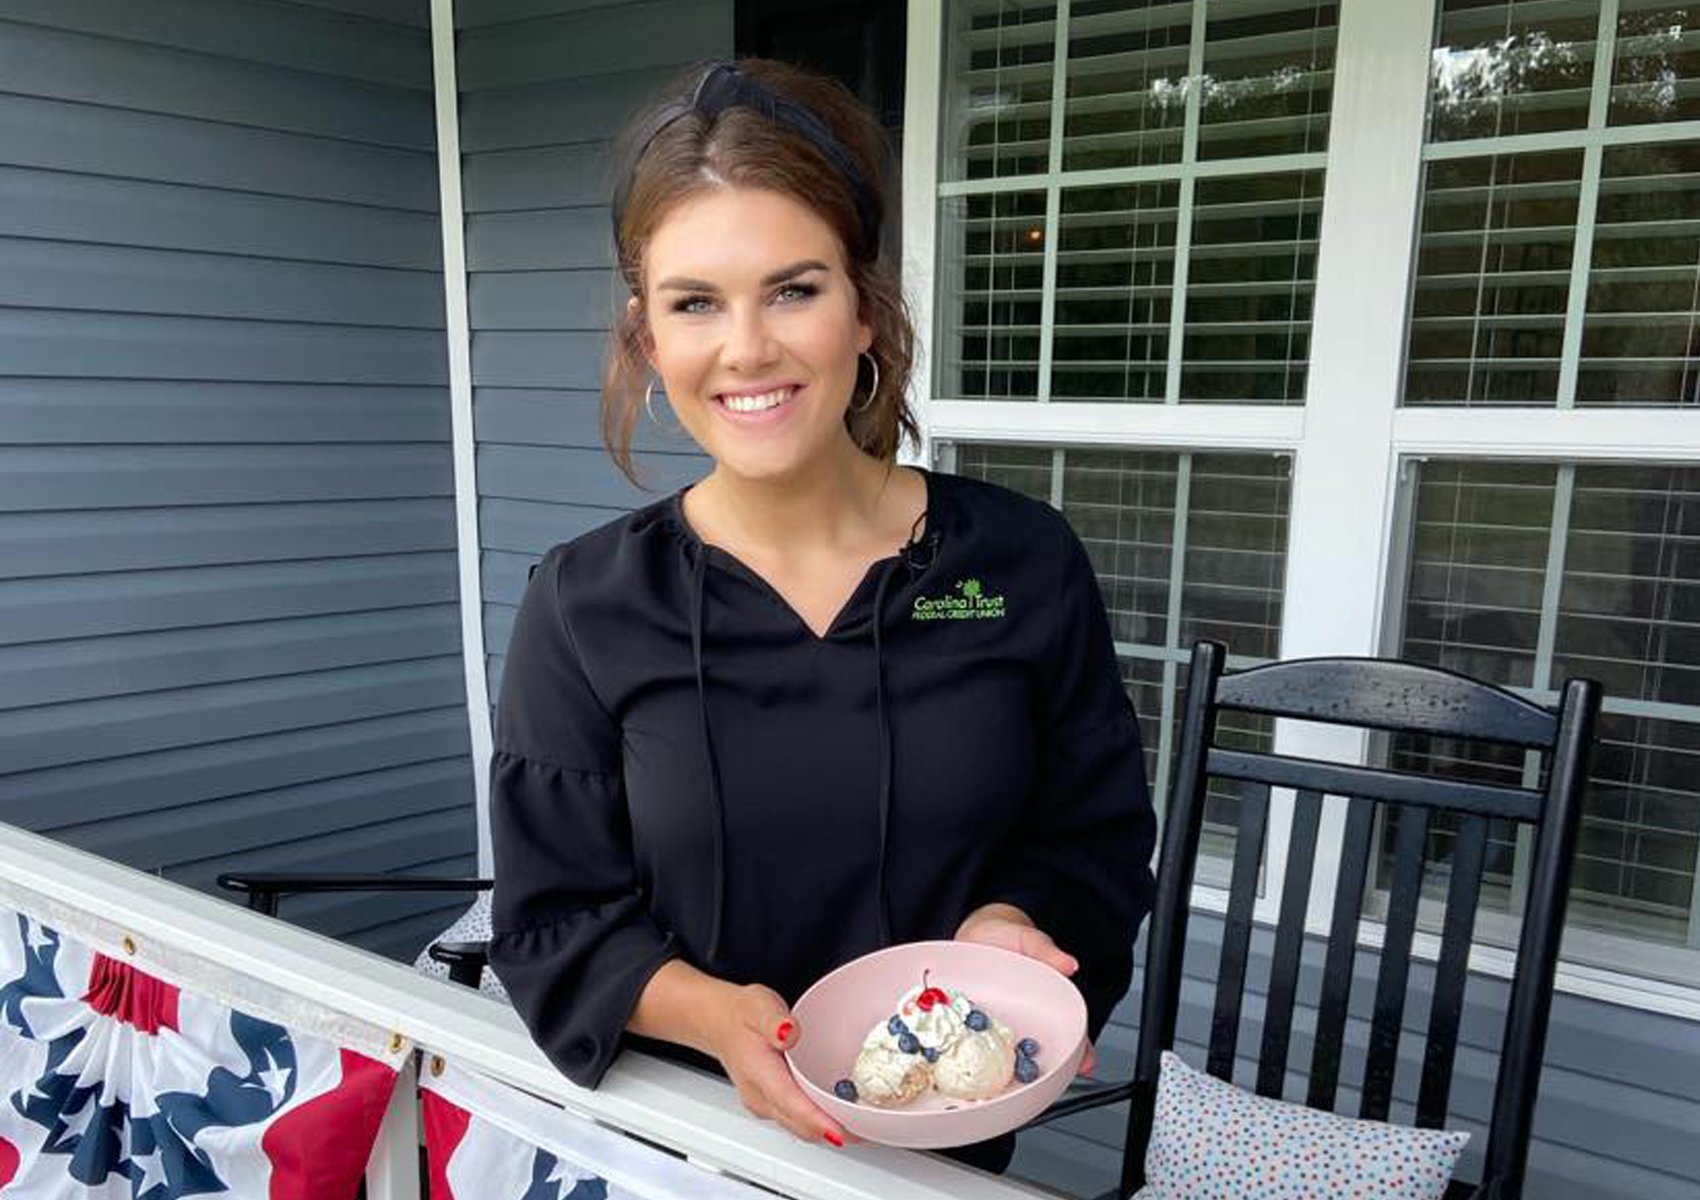
Friday: Homemade Ice Cream
I actually made my Friday, Fourth of July DIY project on Living Local Carolina. I made vanilla ice cream and topped it off with blueberries, whipped cream, and cherry to add a patriotic flare.
What you'll need:
- Homemade Ice Cream Maker (I got mine from Walmart for under $20)
- Mixing Bowl
- Whisk
- Rock Salt
- 4 Cups of Heavy Whipping Cream
- 2 Cups of Half-and-Half
- 1 1/2 Cups of Sugar
- 2 Tablespoons of Vanilla Extract
- Pinch of Salt
- Blueberries (they're better if they're fresh from your local farmers market)
- Whipped Cream
- Cherries
How to Make:
- Put your ice cream canister in the freezer while you mix ingredients.
- Mix all ingredients (I add dry ingredients first and slowly mix in the wet ones.)
- Pour your mixture into the canister.
- Add canister to ice cream maker.
- Add ice and rock salt, alternating layers of each (make sure you have additional ice to add as your ice melts, this will help your ice cream stay colder and thicker.)
- Plug in the ice cream maker and let it churn until it cuts off.
- Once it cuts off, top the ice cream maker off with ice, wrap it in towels, and let it sit so that the ice cream can thicken.
- Once your ice cream is thick enough, serve with blueberries, whipped cream, and a cherry.
I hope you all enjoy making these Fourth of July DIY projects with your friends and family, and have a happy and safe holiday.
